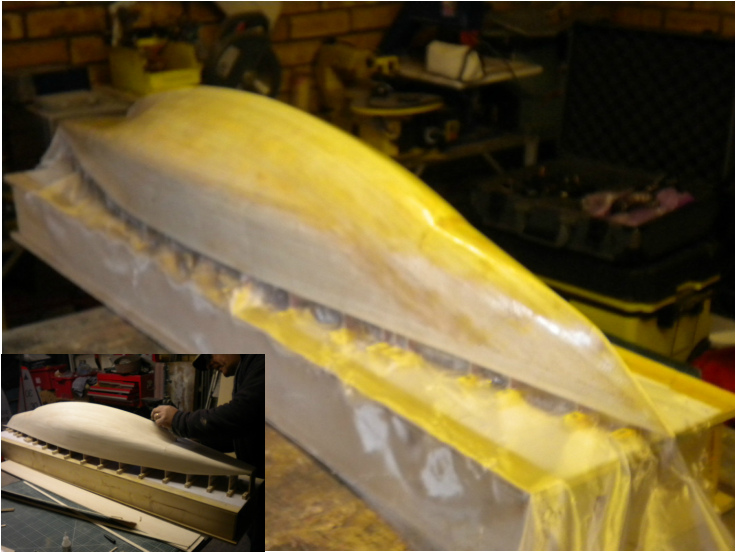
 A couple of hours work today with PJ having sanded the hull to a smooth beautiful shape we progressed to covering her in glass cloth, we have used 25g lightweight cloth we use to cover the Wee Nips, Footys etc fortunately I brought the whole roll as the first piece we cut was too small when it came to be fitted over the already applied polyester resin. A very small panic ensued however with the cold weather at least kept the resin for setting too fast, we were able to get it covered, even if some of us applied our resin more liberally than others!
All we have to do now is wait for it to cure and get sanding, luckly for PJ the Birthday elves bought him wet & dry and some sustinance for his birthday.
2 Comments
I managed to get over to the W@tCotU on Thursday where I discovered that PJ had been doing some secret planking and had managed to fill in the port side complete and done a fair bit of work on the starboard one. I set about this side and got within three planks of a complete hull, meanwhile PJ worked on the stern area, subsequent conversations have lead us to extend the hull section slightly aftwards in the area of the rudder post (so it looks more like the plan).
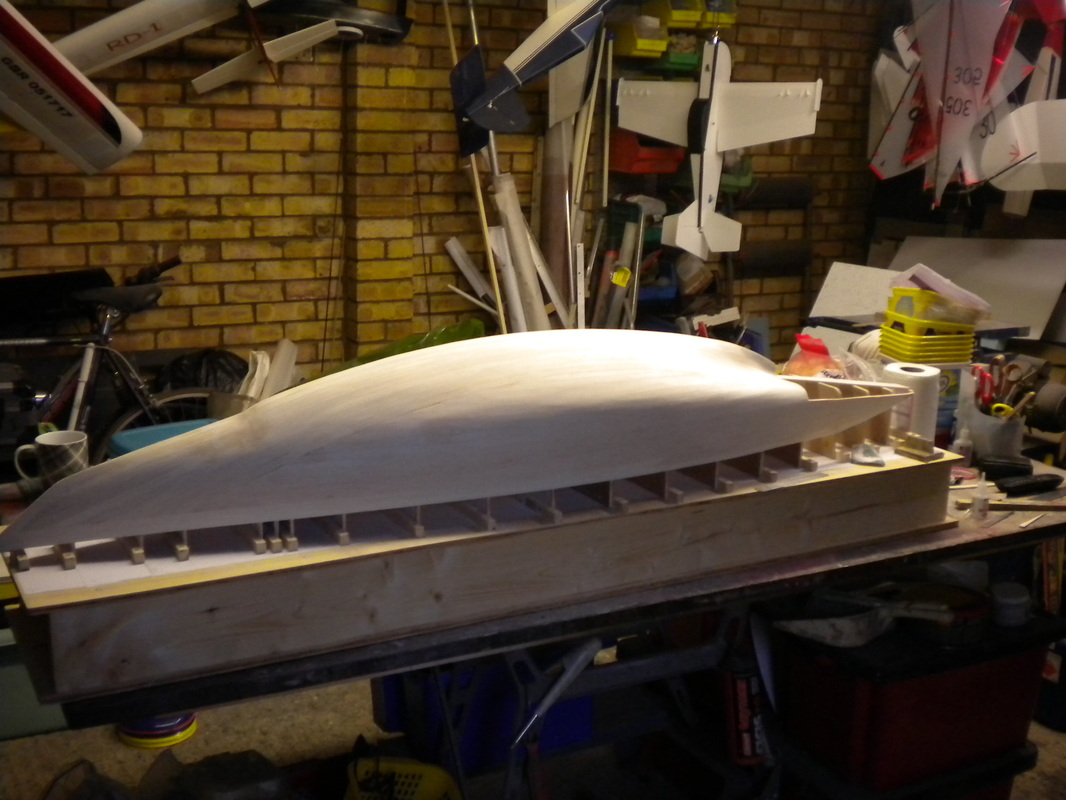
Now we have almost finished planking it looks very much like a yacht and with PJ let lose with vast quantities of grit (sandpaper) I am sure she will start to take on a better shape evne sooner.
Unfortunately work keeps getting in the way for me, however PJ has made some progress on the planking this week although he says planking alone is less fun than planking with a friend, anyway here is a picture to keep your blog hopes alive! 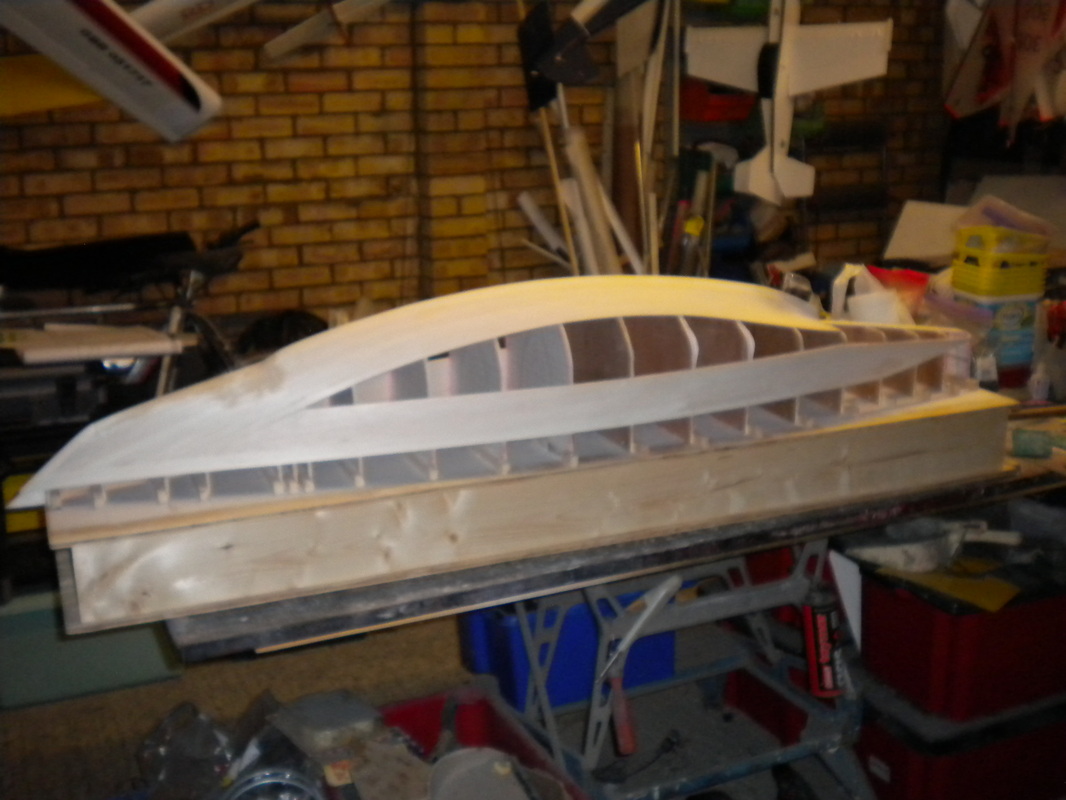
cost nil
time unknown Managed to grab a bit of time at the W@TCOTU yeasterday so we did a few of the tricky first planks onto the shadows. I am not sure we got the first couple to follow the profile very well but with a bit of fettling from Mr Jackson I am confident all will be well! Despite my efforts in purchasing 48" (1200mm to you youngsters) balsa boards most of the planks will have to be scarf jointed, in order to stiffen up the uppermost part of the shadows we decided to put two planks along the top before starting from the gunwhales upwards. Mrs J had been to the needlework shop/basket and provided additional pins and so my steel veneer pins were rejected and had to be content with being inserted to give us the starting point for the gunwhale plank. Thankfully the no-nonsense superglue I bought, 6 tubes from screwfix, (other suppliers are available!) was acceptable! As you can see we are not quite happy with the profile towards the stern, hopefully we won't have to do too much work to sort this out, PJ insisted he got in some pictures this time so that you didn't think it was all my work! I think the pictures show all you need to know. Costs supaglue £7.80
Time spent 4 hours (could have been more!) Put together the strongback, I thought I had some material in stock it turns out I didn't however I found some 1/2" GOS ply at the local merchant Gibbs & Dandy, our local branch are happy to cut board to size and they had an offcut at 1540 long, it was just long enough! Screwed it together onto two pieces of 4 1/4" door lining material top and bottom to make a box. Then off to the "w@tcou" to finish those shadows and get them screwed to the strongback. PJ knows CAD and has plotter so he had printed the shadow positions for us and we used PVA glue to stick it to the strongback. Then we cut across the centre of the shadows at the underside of the deck position to make removing the excess easier, PJ still has all his fingers, (and both thumbs) Then with lots of raking through my screw box to find enough small short ones, and me drilling and PJ fixing we had the shadows complete, all that remained was to debate fixing them onto the strongback and then get on with it. We retired to the warm to work out the NOR's for next years club competitions and whilst we did the Balsa arrived in the post, so when we had done the brain work we went back out into the shed and debated (at length) the best way to complete the planking. Given the number of steps in the hull we are very glad that we are building a plug and not trying to plank this one as timber hull! We sort of formulated a plan but I am sure this will change once we get started! Costs
strongback material - £10.00 time spent - 6 hours We spent today getting the shadows ready for the Romanza plug, I had got the shadow part of the drawing copied 20 times by the local copy shop and spent some of the recent England v Slovenia match cutting around them. With an early start one day last week I was able to stick them to some 1/8 ply I had left over from a job and roughly cut around them with my work jigsaw, I should explain here that I am a kitchen fitter by trade so most of my timber will probably fall of the back of a job! So we now had 20 roughly cut shadows! Todays task was to turn these into the finished article, (well nearly) as there was a lot of lines on the shadows I started by marking around the shadow the line to cut to with highlighter, PJ then cut them out on his scroll saw with a final finish to the exact size on the belt sander. As he was doing this I cut the supports for each shadow from 12 x 15mm pine timber 2inches longer than the bottom of the shadow the final product can be seen here. This final part only took us a couple of hours between us however the cold started to get to us and we decided to call it a day and retire for sustinance before we had attached the supports. 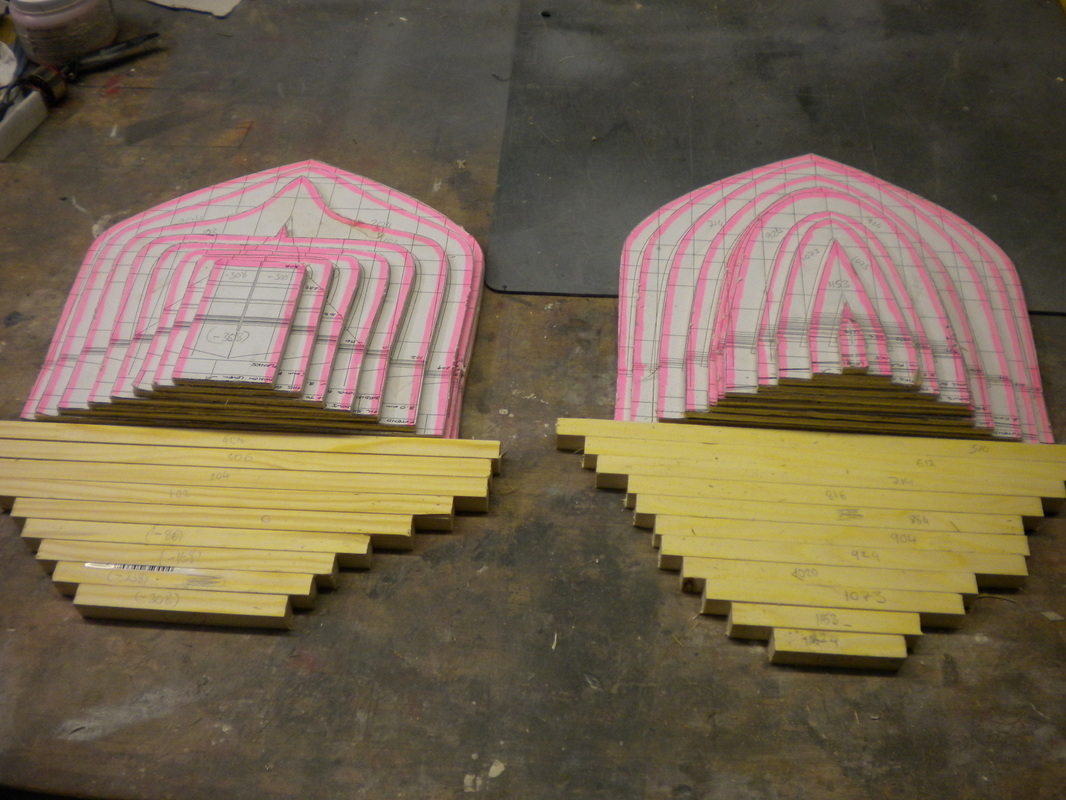 Unfortunately PJ's strong back is to short (by a long way) so my next task it to make a strongback to build the plug on, luckily for me I think I have the very thing in my store!
Costs so far plans £45.00 Materials for shadows £20.00 Time spent 6 hours So whats my motivation for building a Romanza, well I am lucky in the my good friend and cohort in this project PJ has the best "Workshop at the Centre of the Universe" and he has agreed to build it with me.
We are both exceedingly keen Footy enthusiasts and have developed a one design class for Bermuda Rigged Wee Nips which has been well recieved by local skippers. We have also developed a class for smaller yachts called the Micro 540 which aims to Grandfather the Micro Magic whilst hopefully encouraging skippers to dive into their tool box and try a bit of building. As you can see our enthusiasm lies with building things, there is nothing quite like the satisfaction of sailing a yacht you built yourself within an event. So why did we choose the Romanza? Mike Ewart the extremely enthusiastic class captain for the Sixes has been sailing Footy with us throughout 2014, indeed it is safe to say some of his enthusiasm has rubbed off I was looking for a large boat project, for some reason the IOM just doesn't appeal to me, the Mableheads look interesting but our local water isn't that deep and so I settled on the Six with it's short keel and classic yacht looks, the Romanza by Graham Bantock was a design that is available and as yet I don't think there any out there. Graham has a history of great designs for this class abd so it seemed the natural choice. As PJ & I are building this yacht together we have determined that we should build a plug, a mould and then our two sister yachts from it, it is our intention to build the hull in carbon fibre. I thought it might be useful to plot our progress warts and all in this blog. |
AuthorI am Footy skipper turning his hand to the Six Metre class Archives
August 2015
Categories |
- Home
- News @ Six
- About
-
Six Competitions/Reports/Results
- 2024 Competitions
- 2023 Competitions >
-
2022 Competitions
>
- Report 6m National Championship, 8th and 9th October 2022, Bournville RSC and MD6mCS R4
- Midland 6mCS R3 7th September 2022
- Northern District Championship 21st August 2022
- Midland 6mCS R2 17th July, Bournville RS&MBC
- Dartmoor Weekend, 2nd and 3rd July 2022
- Shearwater Trophy 15th May 2022, Broads RYC
- Midland 6mCS R1 14th May 2022, Two Islands
- Tomlinson Vase 2nd May 2022, Harwich and Dovercourt
- Fleetwood Weekender Open Meeting 23rd - 24th April 2022
- Fleetwood Open 12th March 2022
- Fleetwood Open 23rd January 2022
-
2021 Competitions
>
- Report 2021 6m National Championship, 30th & 31st October, Norwich MYC
- Report Sextant Trophy 24th October 2021
- MD6mCS Round 4 and Overall Champion
- ND 6m Championship, 22nd August,2021
- Method of Entry for Natioals 2021
- Notice of Race, 22nd August 2021, Fleetwood
- Report R3 MD6MCS, Two Islands, 24th July 2021
- MD6mCS Round 2, Bournville, 4th July 2021
- Report, Tomlinson Vase, 26th June 2021
- Report R1 MD6MCS 19th June 2021
- Report Shearwater Trophy 23rd May 2021
- 2020 Competitions >
-
2019 Competitions
>
- NOR Sextant Trophy 2019
- Report 2019 National Championship, 7th and 8th September 2019 Dartmoor MBC
- Report Fleetwood Open 25/8/2019
- Fleetwood Open Meeting 25th August 2019
- Report Midland League Series R3
- Doug Tomlinson Vase 29th June 2019
- Introduction to the 2019 National Championship
- Report Midland League Series R2
- Report Midland League Series R1
- Report Fleetwood Open 14th April 2019
- Notice of Race, Fleetwood
- Results and Notice of Race, SW District 6m Championship
- Report Shearwater Trophy 5th May 2019
- Notice of Race Shearwater Trophy 2019
- 2018 Competitions >
-
2017 Competitions
>
- 28th October 2017 - Midlands District Championship >
- 23rd September Open - Abington Park MYC
- 19th August Two Islands Open Report
- 16th July Sextant Trophy, 2002T R2 Lee Valley MYC
- 17th June Dartmoor Open
- 13th/14th May 2017 Six Metre National Championship
- 16th April Shearwater Trophy Broads RYC
- 25th March Two Islands RYC
- 25th February APMYC @ Hollowell SC Open
- 2016 Competitions >
- 2015 Competitions >
- 2002 Trophy Series >
- Rules
- Design & Build
- Clubs
- For Sale
- Wanted
- Contact
- Suppliers
- Link Page
- Miscellaneous
- Six Metre Pictures
- Forum

 RSS Feed

- Home
- News @ Six
- About
-
Six Competitions/Reports/Results
- 2024 Competitions
- 2023 Competitions >
-
2022 Competitions
>
- Report 6m National Championship, 8th and 9th October 2022, Bournville RSC and MD6mCS R4
- Midland 6mCS R3 7th September 2022
- Northern District Championship 21st August 2022
- Midland 6mCS R2 17th July, Bournville RS&MBC
- Dartmoor Weekend, 2nd and 3rd July 2022
- Shearwater Trophy 15th May 2022, Broads RYC
- Midland 6mCS R1 14th May 2022, Two Islands
- Tomlinson Vase 2nd May 2022, Harwich and Dovercourt
- Fleetwood Weekender Open Meeting 23rd - 24th April 2022
- Fleetwood Open 12th March 2022
- Fleetwood Open 23rd January 2022
-
2021 Competitions
>
- Report 2021 6m National Championship, 30th & 31st October, Norwich MYC
- Report Sextant Trophy 24th October 2021
- MD6mCS Round 4 and Overall Champion
- ND 6m Championship, 22nd August,2021
- Method of Entry for Natioals 2021
- Notice of Race, 22nd August 2021, Fleetwood
- Report R3 MD6MCS, Two Islands, 24th July 2021
- MD6mCS Round 2, Bournville, 4th July 2021
- Report, Tomlinson Vase, 26th June 2021
- Report R1 MD6MCS 19th June 2021
- Report Shearwater Trophy 23rd May 2021
- 2020 Competitions >
-
2019 Competitions
>
- NOR Sextant Trophy 2019
- Report 2019 National Championship, 7th and 8th September 2019 Dartmoor MBC
- Report Fleetwood Open 25/8/2019
- Fleetwood Open Meeting 25th August 2019
- Report Midland League Series R3
- Doug Tomlinson Vase 29th June 2019
- Introduction to the 2019 National Championship
- Report Midland League Series R2
- Report Midland League Series R1
- Report Fleetwood Open 14th April 2019
- Notice of Race, Fleetwood
- Results and Notice of Race, SW District 6m Championship
- Report Shearwater Trophy 5th May 2019
- Notice of Race Shearwater Trophy 2019
- 2018 Competitions >
-
2017 Competitions
>
- 28th October 2017 - Midlands District Championship >
- 23rd September Open - Abington Park MYC
- 19th August Two Islands Open Report
- 16th July Sextant Trophy, 2002T R2 Lee Valley MYC
- 17th June Dartmoor Open
- 13th/14th May 2017 Six Metre National Championship
- 16th April Shearwater Trophy Broads RYC
- 25th March Two Islands RYC
- 25th February APMYC @ Hollowell SC Open
- 2016 Competitions >
- 2015 Competitions >
- 2002 Trophy Series >
- Rules
- Design & Build
- Clubs
- For Sale
- Wanted
- Contact
- Suppliers
- Link Page
- Miscellaneous
- Six Metre Pictures
- Forum