INTRODUCTION TO PLANKING - PART THREE
Finishing off
Capping Piece
With the planking completed it is necessary (if you are not making any allowance for the 13mm bow bumper to Class Rule 3.3.11 described previously) to trim the bow and plane a flat surface to accept the capping piece. It has been found the easiest method to fit this was to stand three suitable lengths of planking in water till pliable, then wrap them round the bow profile, holding them temporarily in place with Sellotape. When the planking has dried out remove from the hull and they will have retained most if not all of the necessary curvature. Now laminate and glue into place with temporary pins in the normal way. Incidentally, make the capping piece of sufficient length that it merges into the hull below the water-line, as it not only gives a neat finish to the plank endings but protects the main planking in the event of an unfortunate bow-on collision. Finally remove any veneer pins remaining in the hull and fill the holes with a plastic wood filler. It has been found 'Joy' brand in 'Teak' finish matches very closely to most cedar. Rubbing - down the hull can now commence. This should be done first across the grain of the wood, the planking being traversed in the direction of the cross sections. The glass paper should be wrapped around a suitable piece of thin flexible wood. Coarse grade is used for the start, and gradually finer is used till the final rubbing down is done with the finest grade. Refill any pin holes that require filling and giving close inspection to ensure any stray glue is not left in the surface pores of the timber as you work. It will take some hours work to fair up the hull properly. By this time all the plank edges will have been rubbed right down, and the hull perfectly faired up. Always look at the hull from different angles, and occasionally from a little distance. Persevere until the hull is absolutely perfect. The final rubbing down with the finest grade glass-paper must be done in the direction of the planking.
Now, a couple of tips and a big caution. Do not start rubbing down with anything that is going to score the planks, you will find great difficulty in removing the damage. If a bruise or dent has accidently been put in a plank, lay a damp cloth over the area overnight. The dampness will raise and swell the grain of the wood. Several times previously, distortion between shadows, and hollows have been mentioned.
Mind the Gap
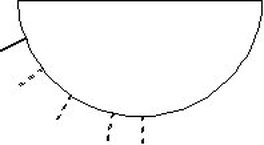
The reader is thus cautioned. At one time the rule did not allow any hollows above the waterline, but now accepts a more realistic 1mm. The most vunerable areas are at the stern where the the hull is often almost straight, if not completely so, in a fore and aft direction.
There can be a similar area at the bow. The rest of the hull should be convex but it is worth checking while you are at it.
You do not want the measurer to find hollows in your finished pride and joy, with the consequence of having to spoil your varnish and paintwork to rid the hull of them.
To check, you will need a 300mm long straightedge - a 12" (30.5cm) steel rule will do nicely. Hold the rule on the hull surface and look for daylight between them. With practice you will be able to judge 1mm, but take no chances. A piece of thin ply or plastic sheet can make a convenient feeler gauge provided that you check its thickness. Use proper feelers if you have them.
Capping Piece
With the planking completed it is necessary (if you are not making any allowance for the 13mm bow bumper to Class Rule 3.3.11 described previously) to trim the bow and plane a flat surface to accept the capping piece. It has been found the easiest method to fit this was to stand three suitable lengths of planking in water till pliable, then wrap them round the bow profile, holding them temporarily in place with Sellotape. When the planking has dried out remove from the hull and they will have retained most if not all of the necessary curvature. Now laminate and glue into place with temporary pins in the normal way. Incidentally, make the capping piece of sufficient length that it merges into the hull below the water-line, as it not only gives a neat finish to the plank endings but protects the main planking in the event of an unfortunate bow-on collision. Finally remove any veneer pins remaining in the hull and fill the holes with a plastic wood filler. It has been found 'Joy' brand in 'Teak' finish matches very closely to most cedar. Rubbing - down the hull can now commence. This should be done first across the grain of the wood, the planking being traversed in the direction of the cross sections. The glass paper should be wrapped around a suitable piece of thin flexible wood. Coarse grade is used for the start, and gradually finer is used till the final rubbing down is done with the finest grade. Refill any pin holes that require filling and giving close inspection to ensure any stray glue is not left in the surface pores of the timber as you work. It will take some hours work to fair up the hull properly. By this time all the plank edges will have been rubbed right down, and the hull perfectly faired up. Always look at the hull from different angles, and occasionally from a little distance. Persevere until the hull is absolutely perfect. The final rubbing down with the finest grade glass-paper must be done in the direction of the planking.
Now, a couple of tips and a big caution. Do not start rubbing down with anything that is going to score the planks, you will find great difficulty in removing the damage. If a bruise or dent has accidently been put in a plank, lay a damp cloth over the area overnight. The dampness will raise and swell the grain of the wood. Several times previously, distortion between shadows, and hollows have been mentioned.
Mind the Gap
The reader is thus cautioned. At one time the rule did not allow any hollows above the waterline, but now accepts a more realistic 1mm. The most vunerable areas are at the stern where the the hull is often almost straight, if not completely so, in a fore and aft direction.
There can be a similar area at the bow. The rest of the hull should be convex but it is worth checking while you are at it.
You do not want the measurer to find hollows in your finished pride and joy, with the consequence of having to spoil your varnish and paintwork to rid the hull of them.
To check, you will need a 300mm long straightedge - a 12" (30.5cm) steel rule will do nicely. Hold the rule on the hull surface and look for daylight between them. With practice you will be able to judge 1mm, but take no chances. A piece of thin ply or plastic sheet can make a convenient feeler gauge provided that you check its thickness. Use proper feelers if you have them.

Slide the rule around the hull to check all the likely areas. Looking at the hull (but greatly exagerated) what you ideally want to see is this.
Not this!
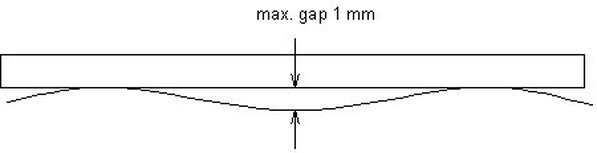
The above is acceptable however provided the gap is not more that 1mm
If it is found that the hollows are too deep, you have to judge whether to sand away the bumps or fill the hollows. Either way, when you have done it, check it again. Keep sanding/filling and checking until you are sure that the hull will pass scrutiny.
The previous observations also apply to the production of a plug for a mould. Whilst rather more difficult to do, it is worth checking the mould too. Inside the mould it's the other way round which makes it much more difficult to measure the gap. If the plug and/or mould is wrong, then all the hulls produced will be wrong too. It then gets a bit difficult to correct them and is outside the scope of this planking section.
At this stage, if you have not already done so, shape the skeg/bustle to the required section.
Sometimes your planking can get a little untidy when running into the skeg/bustle. An additional fairing of the skeg/bustle into the hull using a fillet made up of epoxy and a 50/50 mixture of micro-balloons and coloidial silica to ease the final sanding down operation can be used. This advice was once given to Alan Bright by Ian Cole of Sails Etc., who was always willing to share his wealth of knowledge in the use of epoxy resins, and this no doubt saved Alan a lot of hard work at this stage of his building efforts. The fairing in of the skeg in this way gives a pleasing flow to the hull lines where they meet the skeg forward of the rudder. As in all things, try to do it correctly the first time, its well worth the effort. If not, well try the fillet. See photo C on the previous page.
Coating
One small and vuluable tip before coating the hull. Always ensure all the wood dust is removed from the timber. Go over the hull thoroughly with a vacuum cleaner fitted with a small round brush. The removal of the dust from the timber pores will almost instantly give a lustre and bring life to your planking which will show the grain to better effect. Finally, and the choice is entirely yours, coat the entire hull with varnish or epoxy resin. Both will ensure the timber is impervious to water. Epoxy resin also adds considerably to its strength and increases its weight. When dry, the entire hull can be thoroughly flatted down with medium grade wet and dry, ensure you use plenty of soapy water in this operation to reduce the clogging effect of the epoxy. Or, if using varnish, lightly flat back and wipe clean. Apply another coat. Repeat the operation until you have the finish that your heart desires. Remember, that if your planking does not come out as you had hoped, the hull can always be fully painted. The author knows of several that have been painted from the start, and some more that have subsequently been done to cover up several seasons honourable battle scars. The point being, that you will still have a very competitative hull. Along with the pleasure of knowing that you have built it yourself.
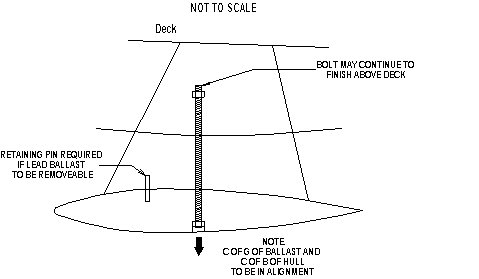
Before removing the hull from the jig there are a couple of items still to fit, which are best carried out prior to removal. The first task is to laminate and fit the fin. You can either make your fin as in diagram 'A', which is relatively simple to produce and was used with success in a previous Six Metre, hence the slot down to deck level in section 5.
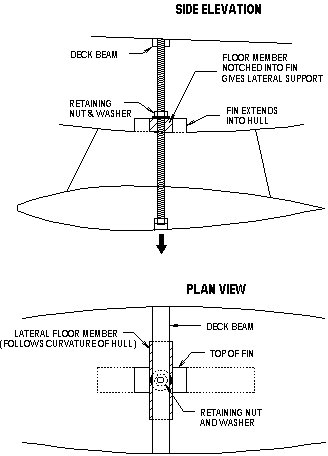
This time, however, after seeing the interior of an A boat, I decided to adopt the same approach as that which keeps the interior of the boat as clear as possible, as shown in diagram 'B'.
If it is found that the hollows are too deep, you have to judge whether to sand away the bumps or fill the hollows. Either way, when you have done it, check it again. Keep sanding/filling and checking until you are sure that the hull will pass scrutiny.
The previous observations also apply to the production of a plug for a mould. Whilst rather more difficult to do, it is worth checking the mould too. Inside the mould it's the other way round which makes it much more difficult to measure the gap. If the plug and/or mould is wrong, then all the hulls produced will be wrong too. It then gets a bit difficult to correct them and is outside the scope of this planking section.
At this stage, if you have not already done so, shape the skeg/bustle to the required section.
Sometimes your planking can get a little untidy when running into the skeg/bustle. An additional fairing of the skeg/bustle into the hull using a fillet made up of epoxy and a 50/50 mixture of micro-balloons and coloidial silica to ease the final sanding down operation can be used. This advice was once given to Alan Bright by Ian Cole of Sails Etc., who was always willing to share his wealth of knowledge in the use of epoxy resins, and this no doubt saved Alan a lot of hard work at this stage of his building efforts. The fairing in of the skeg in this way gives a pleasing flow to the hull lines where they meet the skeg forward of the rudder. As in all things, try to do it correctly the first time, its well worth the effort. If not, well try the fillet. See photo C on the previous page.
Coating
One small and vuluable tip before coating the hull. Always ensure all the wood dust is removed from the timber. Go over the hull thoroughly with a vacuum cleaner fitted with a small round brush. The removal of the dust from the timber pores will almost instantly give a lustre and bring life to your planking which will show the grain to better effect. Finally, and the choice is entirely yours, coat the entire hull with varnish or epoxy resin. Both will ensure the timber is impervious to water. Epoxy resin also adds considerably to its strength and increases its weight. When dry, the entire hull can be thoroughly flatted down with medium grade wet and dry, ensure you use plenty of soapy water in this operation to reduce the clogging effect of the epoxy. Or, if using varnish, lightly flat back and wipe clean. Apply another coat. Repeat the operation until you have the finish that your heart desires. Remember, that if your planking does not come out as you had hoped, the hull can always be fully painted. The author knows of several that have been painted from the start, and some more that have subsequently been done to cover up several seasons honourable battle scars. The point being, that you will still have a very competitative hull. Along with the pleasure of knowing that you have built it yourself.
Before removing the hull from the jig there are a couple of items still to fit, which are best carried out prior to removal. The first task is to laminate and fit the fin. You can either make your fin as in diagram 'A', which is relatively simple to produce and was used with success in a previous Six Metre, hence the slot down to deck level in section 5.
This time, however, after seeing the interior of an A boat, I decided to adopt the same approach as that which keeps the interior of the boat as clear as possible, as shown in diagram 'B'.
The fin was laminated from two pieces of 10mm x 155cm long obechi, with the grain reversed to make a block 20mm thick, which is the narrowest chord thickness of the fin at the root section where it enters the hull - your slot in the hull needs to be 20mm wide. To this was laminated one extra piece 10mm thick, each side where the fin protrudes below the hull, to allow for the extra chord thickness of the fin at the lower edge, (see plans). Before going any further drill a hole to take the 6mm stainless steel studding used to attach the ballast keel. Take care to ensure this is drilled on the centre Iine and is vertical; ideally it should also be in line with the centre of buoyancy and centre of gravity as marked on the drawing. Now shape to the correct profile, checking the original plan which is fairly easy with obechi using a sharp plane, followed by a file and/or glasspaper.
Do not be tempted to experiment with fin shapes and dimensions unless you really know what you are doing and realise the consequences of your actions! The designer will have taken into account the fin profile etc., in his displacement calculations when arriving at the correct rating for the design, so any alteration by the builder could upset these important factors as well as the positioning of the sail plan.
At this stage the rudder can also be laminated using the template already made out to give the required profile.
