INTRODUCTION TO PLANKING - PART FOUR
Rudder Tube
With the fin epoxy coated and bonded into place. Drill out the hole for the rudder tube and glue into position using 5 minute epoxy, ensuring that this is correctly aligned in relation to the centre line of the hull and fin.
Painting
Finally, the author chooses to paint to the water-line prior to removal of the hull from the jig as this is easier with the hull rigidly held in a level attitude. To mark the water-line correctly, make up some blocks of wood with a long pencil set on top to the correct height. This height is the obtained from the plan, and is the total thickness of your building board, plus the measurement from the datum-line to the water-line. With the building board on a flat surface, bring the marker assembly up to the hull and mark at about 2 inch (5cm) increments. Using masking tape follow the marks around the hull. Cover the top-sides with newspaper, and commence painting and flatting back. When all is to your satisfaction, increase the height of the marking blocks by the width that you require for the boot-topping. Repeat the marking process, mask and paint as required. Do not make the boot-topping too wide as it looks awful when the hull heels on the water. 1/2 an inch (1.3cm)is probably a good point of reference, remembering what happens at the bow and stern to the upper part of the boot-topping as it extends. When all the paint work is thoroughly hardened, move on.
You can now carefully remove the hull from the jig by unscrewing the shadow mounting pieces; you did attach them from underneath didn't you?. A few taps will remove any shadows that might be stuck with stray glue and you are now ready for the final fitting out process.
Fitting Out
With the removal of the hull from the jig, work can now begin on the final fitting out stage, which although straightforward always tends to take longer than one expects. The first job is to install the extra inwales, which is easily accomplished using a couple of the remaining planks and plenty of clothes pegs. At this stage insert a couple of temporary beams to stop the hull from distorting.
With the inwales inserted the inside of the hull can be cleaned up of glue blobs, and the fin reinforcement fitted. Now is the time to coat the inside of the hull, as previously discussed.
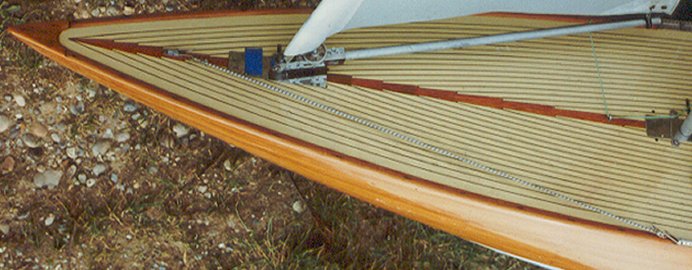
Deck Beams
It was decided that a traditional oblong hatch arrangement with all the radio equipment below decks on a removable plate, and the receiver in a radio pot also beneath the hatch, would best suit. After deciding on the sheeting arrangement and the location of all the necessary fittings, the deck beams can be installed by notching into the inwales. All the deck beams were constructed from two or three laminations of cedar planking; this has the advantage of strength and lightness plus all those odd pieces remaining after planking can be put to good use. A king plank, with partners for the sliding mast fitting, was installed from the bow to the main beam ( attached to the lead fixing rod ). The author prefers a sliding mast because it facilitates finer final tuning. With all the deck beams in place these can then be varnished or epoxy coated on all except the top surface, also at this stage the mast step should be fitted as this is a lot easier minus the deck.
Transom
The transom is now fitted by glueing on a small block of cedar, after carefully cutting the stern planks to the correct angle, and then shaping it to fit whilst actually on the boat. An alternative method would be to let the transom inside the planking, but having looked at several transoms It was decided to use the first approach which gives a nice shapely transom as shown on the original drawing. This method has the added advantage of covering the plank ends.
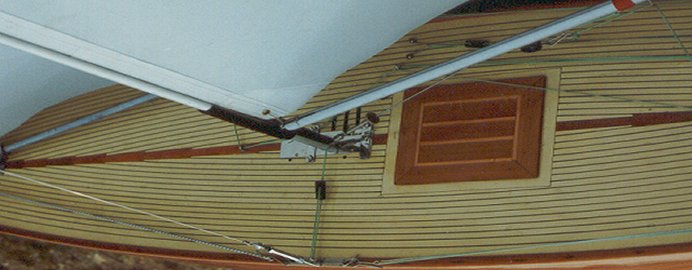
Deck
Before fitting the deck run a strip of masking tape around the hull at deck level. This serves the dual purpose of keeping any excess glue off the hull and you can mark the position of all the deck beams so you know where to make the holes for hatches and fittings!
For the decking, marine 1.5mm waterproof 3 ply varnished is probably the best. The deck should be bonded on with a view to subsequent removal, in the hopefully distant future, and as such 'Thixofix' is; an excellent adhesive. ( You can still find it if you look hard enough ) With the deck in place and all the hatches cut out. Glue some spare pieces of plank on the inside of hatch so they act as coamings ensuring that they are proud of the deck. Make the hatch a good tight fit over and around them for good water proofing. It will stop all the water that is always on the deck, getting inside the hull onto the electrics. The authors preference is to line the marine ply deck to immitate deck planking, including picking out any hatch surrounds and having a highlighted centre plank. This is done after painting the decking material. The scale of unpainted ply sheet markings does not lend itself to varnishing after lining.
There are two styles of deck lining. The first is with parallel straight fore-and-aft lines, but this is not used for the best work. The best decks are laid in narrow planks running parallel with the deck edge. These curved lines can be very difficult to put in nicely unless the proper method is employed. Use a draughtmans ruling pen. Arrange a marking gauge to hold the pen, and using the deck edge as a guide, the planks can be put in without any undue difficulty. When the deck is laid in this manner it has a king plank running down the centre, which if painted as teak or mahogany makes for a nice finish. After the lining is dry a couple of light coats of varnish provides all of the protection needed. Lining the deck in the same manner while it is in position on the hull is the same procedure. There is an alternative lining method, which requires that a template in light ply is taken from the deck edge.This is the used to mark the deck from the outer curve plank progressing to the inner curve plank, by carefull incremental realignment each time a line is completed. When one half of the deck is completed, turn the template over and repeat the operation for the other half. Deck lining for best work, is completed by using covering boards or capping rails.
With the fin epoxy coated and bonded into place. Drill out the hole for the rudder tube and glue into position using 5 minute epoxy, ensuring that this is correctly aligned in relation to the centre line of the hull and fin.
Painting
Finally, the author chooses to paint to the water-line prior to removal of the hull from the jig as this is easier with the hull rigidly held in a level attitude. To mark the water-line correctly, make up some blocks of wood with a long pencil set on top to the correct height. This height is the obtained from the plan, and is the total thickness of your building board, plus the measurement from the datum-line to the water-line. With the building board on a flat surface, bring the marker assembly up to the hull and mark at about 2 inch (5cm) increments. Using masking tape follow the marks around the hull. Cover the top-sides with newspaper, and commence painting and flatting back. When all is to your satisfaction, increase the height of the marking blocks by the width that you require for the boot-topping. Repeat the marking process, mask and paint as required. Do not make the boot-topping too wide as it looks awful when the hull heels on the water. 1/2 an inch (1.3cm)is probably a good point of reference, remembering what happens at the bow and stern to the upper part of the boot-topping as it extends. When all the paint work is thoroughly hardened, move on.
You can now carefully remove the hull from the jig by unscrewing the shadow mounting pieces; you did attach them from underneath didn't you?. A few taps will remove any shadows that might be stuck with stray glue and you are now ready for the final fitting out process.
Fitting Out
With the removal of the hull from the jig, work can now begin on the final fitting out stage, which although straightforward always tends to take longer than one expects. The first job is to install the extra inwales, which is easily accomplished using a couple of the remaining planks and plenty of clothes pegs. At this stage insert a couple of temporary beams to stop the hull from distorting.
With the inwales inserted the inside of the hull can be cleaned up of glue blobs, and the fin reinforcement fitted. Now is the time to coat the inside of the hull, as previously discussed.
Deck Beams
It was decided that a traditional oblong hatch arrangement with all the radio equipment below decks on a removable plate, and the receiver in a radio pot also beneath the hatch, would best suit. After deciding on the sheeting arrangement and the location of all the necessary fittings, the deck beams can be installed by notching into the inwales. All the deck beams were constructed from two or three laminations of cedar planking; this has the advantage of strength and lightness plus all those odd pieces remaining after planking can be put to good use. A king plank, with partners for the sliding mast fitting, was installed from the bow to the main beam ( attached to the lead fixing rod ). The author prefers a sliding mast because it facilitates finer final tuning. With all the deck beams in place these can then be varnished or epoxy coated on all except the top surface, also at this stage the mast step should be fitted as this is a lot easier minus the deck.
Transom
The transom is now fitted by glueing on a small block of cedar, after carefully cutting the stern planks to the correct angle, and then shaping it to fit whilst actually on the boat. An alternative method would be to let the transom inside the planking, but having looked at several transoms It was decided to use the first approach which gives a nice shapely transom as shown on the original drawing. This method has the added advantage of covering the plank ends.
Deck
Before fitting the deck run a strip of masking tape around the hull at deck level. This serves the dual purpose of keeping any excess glue off the hull and you can mark the position of all the deck beams so you know where to make the holes for hatches and fittings!
For the decking, marine 1.5mm waterproof 3 ply varnished is probably the best. The deck should be bonded on with a view to subsequent removal, in the hopefully distant future, and as such 'Thixofix' is; an excellent adhesive. ( You can still find it if you look hard enough ) With the deck in place and all the hatches cut out. Glue some spare pieces of plank on the inside of hatch so they act as coamings ensuring that they are proud of the deck. Make the hatch a good tight fit over and around them for good water proofing. It will stop all the water that is always on the deck, getting inside the hull onto the electrics. The authors preference is to line the marine ply deck to immitate deck planking, including picking out any hatch surrounds and having a highlighted centre plank. This is done after painting the decking material. The scale of unpainted ply sheet markings does not lend itself to varnishing after lining.
There are two styles of deck lining. The first is with parallel straight fore-and-aft lines, but this is not used for the best work. The best decks are laid in narrow planks running parallel with the deck edge. These curved lines can be very difficult to put in nicely unless the proper method is employed. Use a draughtmans ruling pen. Arrange a marking gauge to hold the pen, and using the deck edge as a guide, the planks can be put in without any undue difficulty. When the deck is laid in this manner it has a king plank running down the centre, which if painted as teak or mahogany makes for a nice finish. After the lining is dry a couple of light coats of varnish provides all of the protection needed. Lining the deck in the same manner while it is in position on the hull is the same procedure. There is an alternative lining method, which requires that a template in light ply is taken from the deck edge.This is the used to mark the deck from the outer curve plank progressing to the inner curve plank, by carefull incremental realignment each time a line is completed. When one half of the deck is completed, turn the template over and repeat the operation for the other half. Deck lining for best work, is completed by using covering boards or capping rails.
With the hull completed it now remains to attach all the deck hardware and complete the rig, ( consult the Class rule ). A standard 2 - channel radio installation is still the most popular amongst most of the skippers in this class.
Testing
You are now ready for an initial floatation test. This can be carried out in the Armitage Shanks test tank (bath) with a compensating weight placed on deck for the absent rig and sails. First attach the unfinished lead ballast. Remember that the total minimum displacement of this boat including rig is 26.58 Imperial Ibs. ( you should be able to calculate the Metric for yourself by now ). The ballast position and/or weight should be adjusted to ensure the boat floats exactly to its designed water line without any heel to port or starboard. Use a small spirit level to check this. Unless you have built in deck camber, which then makes this part all the more fun. With this accomplished it is sound advice for any builder to have the boat officially measured before permanently attaching the ballast keel and painting it.
With the boat measured ( using a borrowed set of sails ), the sails can be ordered from your favourite sail maker to the exact dimensions allowed after measurement. Then back to the Measurer for the sails to be measured, and you will now be the proud possessor of a valid certificate.
2014 update from Henry Farley
It is not permissible to use borrowed sails in the way he describes as that would be contrary to the rules.
The boat must be measured with its own sails when measuring for the purposes of getting a certificate.
Whilst it is useful to check a boat with borrowed sails ( I keep some for that purpose) it only establishes what can be fitted to the boat.
Once the proper sails are made the boat must then be measured with the proper sails.
Tedious but true and has certainly always been my practice.
